Employee Self-Service: Updating Direct Deposit
The purpose of this article is to walk the user through how to add new or edit direct deposit account information in isolved.
Add New Account
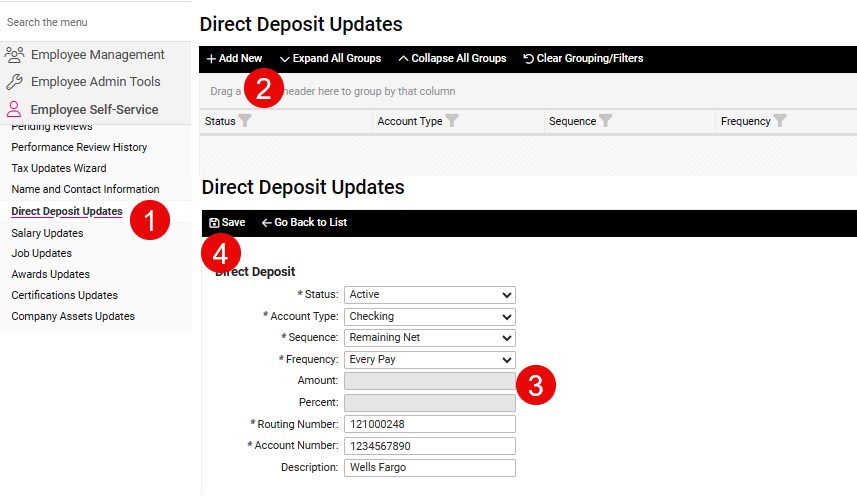
- Login to isolved and navigate to Employee Self-Service > Direct Deposit Updates
- Click +Add New
-
Complete the required fields:
- Status: Set to Active to use the bank account; Set to Inactive to stop using an existing account.
- Account Type: Checking, Savings, Pay Card (Checking), Pay Card (Savings)
-
Sequence: If you are using only one bank account, the sequence will equal Remaining Net. If using more than one bank account, set the sequence on your first account to 1, then set the sequence on your second account to Remaining Net.
- For example, if you want to send $50 to a Bank of America saving account and the rest of your check to a Wells Fargo checking account, you would set the Bank of America to sequence 1 and Wells Fargo to Remaining Net.
- Amount: Only used when you have more than one bank account
- Percent: Only used when you have more than one bank account
- Routing Number: Required
- Account Number: Required
- Description: Optional bank account description
-
Click Save
- If your organization uses a workflow for approving changes to direct deposit accounts, the approval workflow will kick off once you save the direct deposit account.

Update Existing Bank Account
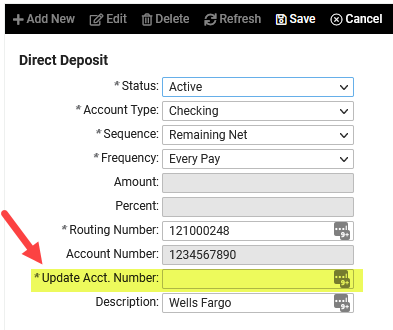
- To change an existing bank account, follow the same steps as described above to access the Direct Deposit Update menu.
- If you want to stop using the bank account, set the Status to Inactive.
- You may edit all fields except the Account Number. To change the account number, use the *Update Acct. Number field.
- Click Save when finished
**If you are removing a bank account that should no longer be used, our recommendation is to set the account to Inactive. Technically, you may delete the account but the best practice is to set the account to Inactive. This way you have a historical view of all accounts.
